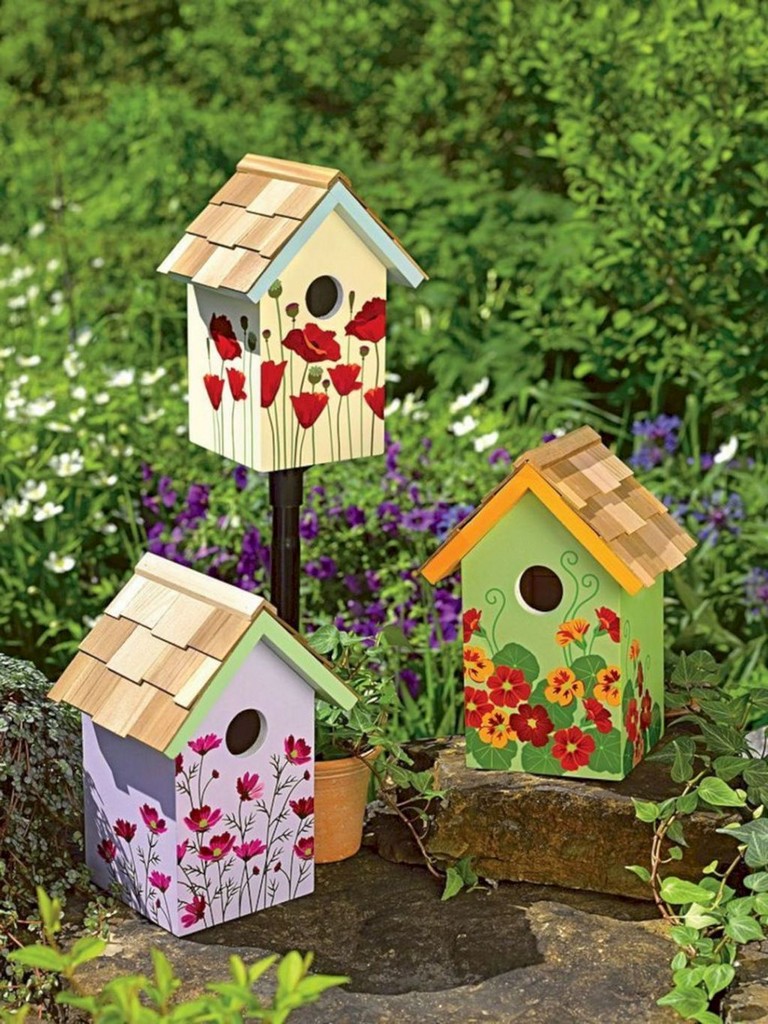
How to Design a Birdhouse for a Comfortable Nesting Environment

How to Design a Birdhouse for a Comfortable Nesting Environment

Designing a Birdhouse for a Comfortable Nesting Environment

Providing a safe and comfortable nesting environment for birds can be a rewarding experience. By designing a birdhouse that meets the specific needs of the bird species you wish to attract, you can encourage their presence in your garden and contribute to the health of local bird populations. This guide will delve into the essential elements of birdhouse design, covering aspects like location, dimensions, materials, and features to consider for optimal comfort and safety.

Choosing the Right Birdhouse for Your Location

Before you begin designing or constructing your birdhouse, it's crucial to consider the types of birds that inhabit your area and their specific nesting preferences. Researching local bird species and their preferred habitats will help you choose the appropriate size, shape, and features for your birdhouse.

Identifying Local Bird Species

Start by observing the birds in your neighborhood. You can use field guides, online resources, or local birdwatching clubs to identify common species. Some popular backyard birds include:

  • Chickadees
  • Nuthatches
  • Downy Woodpeckers
  • Bluebirds
  • House Wrens

Understanding Birdhouse Preferences

Once you know which birds you want to attract, research their nesting habits. Factors to consider include:

  • Size: Different species have different body sizes and require birdhouses with varying interior dimensions to accommodate their needs.
  • Entry Hole Size: The size of the entry hole should be appropriate for the species, preventing larger predators from entering while allowing the desired bird to access the nest easily.
  • Nest Box Shape: Some birds prefer square or rectangular boxes, while others prefer round or cylindrical shapes. Consider the specific needs of the target species.
  • Materials: Some birds prefer natural materials like wood, while others may tolerate plastic or metal. Research the preferred material for your chosen species.

Designing for Comfort and Safety

Once you've identified the target species and their preferences, you can begin designing a birdhouse that maximizes comfort and safety. The following aspects are crucial:

Dimensions and Entry Hole Size

The dimensions of the birdhouse, including the height, width, and depth, should be appropriate for the bird species. The entry hole size should be slightly larger than the bird's head, allowing it to enter and exit easily. A smaller entry hole can deter predators while allowing the bird to feel secure.

Materials and Construction

Choose durable and weather-resistant materials for the construction of the birdhouse. Cedar, redwood, and pine are excellent choices for their natural resistance to rot and decay. Avoid using treated lumber, as the chemicals can be harmful to birds. Construct the birdhouse with tight-fitting joints and avoid any gaps or cracks that could allow predators or drafts to enter.

Ventilation and Drainage

Proper ventilation is crucial to prevent the buildup of moisture and humidity inside the birdhouse, which can lead to fungal growth and diseases. Include ventilation holes or openings at the top or sides of the birdhouse. Ensure that there's a slight slope to the roof to allow rainwater to drain away from the entrance.

Nesting Material and Cleaning

Provide a nesting material that is safe and comfortable for the birds. Soft materials like shredded paper, pine shavings, or straw are ideal. Avoid using materials that could be harmful to birds, such as cotton balls, wool, or synthetic fibers. The birdhouse should be easily cleaned between nesting seasons to remove old nests and prevent the spread of parasites.

Location and Placement

Choosing the right location for your birdhouse is crucial for attracting birds and ensuring their safety. Consider the following factors:

Height and Visibility

Place the birdhouse at a height that is appropriate for the species, ensuring that it is out of reach of predators. A minimum height of 5 feet is recommended, with taller placements being preferred for some species. Ensure that the entrance of the birdhouse is visible from a distance to make it attractive to birds.

Protection and Shelter

Position the birdhouse in a sheltered spot that offers protection from strong winds, heavy rain, and direct sunlight. A tree, shrub, or other structure can provide adequate shielding. Avoid placing the birdhouse in areas with high foot traffic or close to busy roadways.

Food and Water Sources

Birds are more likely to choose a nesting site if they have access to food and water nearby. Consider planting native plants that attract insects and provide nectar. Place a bird feeder or a birdbath within a reasonable distance from the birdhouse to make it more attractive to birds.

Additional Features to Enhance Nesting Comfort

To further improve the comfort and safety of the birdhouse, consider adding some additional features:

Predator Guard

To protect the birds from predators like snakes or raccoons, consider adding a predator guard around the base of the birdhouse. This can be a simple metal shield or a more elaborate design that encircles the entire birdhouse.

Perch

A perch can be installed near the entrance of the birdhouse to provide a landing spot for the birds. This can make it easier for them to enter and exit the birdhouse, especially in windy conditions.

Cleaning Door

A cleaning door can be incorporated into the design of the birdhouse to make it easier to clean between nesting seasons. This can be a small hinged door on the side or bottom of the birdhouse that allows access to the interior.

Maintenance and Monitoring

Once you've installed your birdhouse, it's essential to maintain and monitor it to ensure its safety and functionality. Regularly check the birdhouse for signs of damage, wear, or infestation. Clean it between nesting seasons to remove old nests and debris. Monitor the activity of the birds to ensure that they are using the birdhouse successfully. This will help you make any necessary adjustments or repairs to improve the nesting environment and attract more birds to your garden.

By following these guidelines and paying attention to the needs of your local bird species, you can design and build a birdhouse that provides a comfortable, safe, and inviting nesting environment. Not only will you enjoy the pleasure of watching birds raise their young, but you will also be contributing to the conservation and preservation of local bird populations.

Share:

How to build an in-wall gun cabinet with multiple compartments

How to build an in-wall gun cabinet with multiple compartments

Building an In-Wall Gun Cabinet with Multiple Compartments

An in-wall gun cabinet offers a discreet and secure way to store firearms within your home. Building one with multiple compartments allows for organized storage and tailored security measures for different types of firearms. This guide provides a comprehensive approach to constructing an in-wall gun cabinet, covering planning, material selection, and step-by-step instructions.

Planning Your In-Wall Gun Cabinet

1. Determine Location and Size

Choosing the right location is crucial. Consider factors like accessibility, proximity to electrical outlets, and potential wall studs. Measure the available space to determine the cabinet's dimensions. Remember to account for the thickness of the drywall and any finishing materials.

2. Design the Cabinet Structure

Sketch out your design, considering the number of compartments, their sizes, and any desired features like shelves, drawers, or locking mechanisms. A simple design with two or three compartments might be ideal for beginners, while more complex structures can cater to larger collections.

3. Material Selection

The primary material for the cabinet frame should be sturdy and resistant to moisture. Consider using:

  • Wood: Oak, maple, or walnut provide strength and aesthetic appeal.
  • Metal: Steel or aluminum offer robust construction, particularly for high-security applications.
  • Plywood: Strong and lightweight, plywood can be a cost-effective option.

For the doors and compartments, consider using:

  • Solid wood: Provides a traditional look and good security.
  • MDF (Medium-Density Fiberboard): A budget-friendly option, MDF can be painted or stained.
  • Metal: Offers superior strength and resistance to tampering.

Building the Gun Cabinet Frame

1. Cutting and Assembling Frame Components

Cut the wood or metal frame pieces to your desired dimensions. Use a circular saw or miter saw for precision. Ensure all cuts are square and accurate. Assemble the frame using wood glue and screws. For a sturdier frame, consider adding corner braces or gussets.

2. Installing the Frame in the Wall

Locate wall studs and mark their positions on the wall. Install the frame using screws that penetrate the studs for secure anchoring. Ensure the frame is level and plumb using a level and plumb bob.

Creating Compartments and Doors

1. Building Compartment Shelving

For each compartment, cut shelves to size and install them using shelf supports or brackets. Use strong brackets that can handle the weight of the firearms. Consider using adjustable shelves for flexible storage.

2. Crafting Doors

Cut door panels to size. Attach hinges to the door panels and frame. If using solid wood doors, reinforce them with cross-bracing for extra strength. Install locking mechanisms for each door.

3. Adding Finishing Touches

Apply a finish to the wood, such as paint, stain, or varnish, for protection and aesthetics. If using metal, consider powder coating or painting for a durable finish.

Security Considerations

1. Locking Mechanisms

Utilize high-quality locking mechanisms, including multiple locks, deadbolts, or a combination lock. Consider using biometric locks for enhanced security.

2. Security Plate

Install a sturdy security plate on the outside of the cabinet for added protection against forced entry. This plate should cover the entire cabinet face and be anchored to the wall studs.

3. Concealing the Cabinet

Consider camouflaging the cabinet's appearance by integrating it with surrounding décor. Paint it to match the wall color or add a decorative covering.

Finishing Touches

1. Interior Lighting

Install interior lighting to illuminate the cabinet's contents. Use LED lights for energy efficiency and a long lifespan.

2. Ventilation

Ensure proper ventilation to prevent moisture build-up and potential damage to firearms. Install small vents in the cabinet for air circulation.

3. Final Touches

Add any desired accessories such as gun racks, hooks, or foam inserts to organize and secure your firearms.

Safety Precautions

Before starting any project, carefully read all safety instructions and wear appropriate personal protective equipment (PPE), including safety glasses, gloves, and hearing protection. Use caution when handling power tools and follow all safety guidelines for handling firearms.

Conclusion

Building an in-wall gun cabinet with multiple compartments requires careful planning, attention to detail, and a commitment to safety. By following these steps, you can create a secure, organized, and aesthetically pleasing storage solution for your firearms.

Share:

How to Make a Birdhouse for Your Feathered Friends

How to Make a Birdhouse for Your Feathered Friends

Building a Birdhouse: A Guide for Bird Lovers

There's something truly magical about watching birds flitting around your backyard, their cheerful songs filling the air. But what if you could entice them to stay a little longer, making your garden their home? Building a birdhouse is a rewarding project that brings nature closer and provides a haven for these feathered friends. Let's embark on this creative journey together and discover how to build the perfect birdhouse for your backyard.

Choosing the Right Birdhouse Design

The first step is to decide which birds you want to attract. Different bird species have preferences for house size, entrance hole diameter, and location. Researching the common birds in your area will help you tailor your design accordingly. For instance, a bluebird prefers a small, open-front house, while a chickadee might favor a more enclosed design with a smaller entrance hole. Consider their nesting habits, their preferred food sources, and even the local predators that might pose a threat.

Materials and Tools

Once you've chosen your design, gather the necessary materials and tools. You'll need:

  • Wood: Pine, cedar, or redwood are popular choices for their durability and resistance to rot. Choose untreated wood to avoid harming the birds.
  • Screws or nails: Use galvanized or stainless steel fasteners for longevity.
  • Saw: A circular saw or jigsaw will be handy for cutting the wood.
  • Drill: A drill with various bits will help you create holes for ventilation and the entrance.
  • Measuring tape: Essential for precise cuts and dimensions.
  • Level: Ensures that your birdhouse is level and stable.
  • Sandpaper: Smooth the edges of the wood to prevent splinters.
  • Paint or stain: Optional, but can add a touch of color and protection to the wood.

Constructing the Birdhouse

Now, let's build the house:

  1. Cut the wood: Based on your chosen design, cut the pieces of wood to the required dimensions. Make sure the floor and roof pieces are slightly larger than the sides to create an overhang.
  2. Assemble the sides: Join the side pieces together using screws or nails, creating a rectangular or square structure.
  3. Attach the floor and roof: Secure the floor to the bottom of the sides and attach the roof to the top using screws or nails. Consider adding a small overhang to the roof to protect the entrance from rain.
  4. Create the entrance hole: Drill a hole in the front panel for the entrance, ensuring the diameter is appropriate for the bird species you're targeting.
  5. Add ventilation holes: Drill a few small holes near the top of the sides for ventilation.
  6. Sand and finish: Sand the edges of the wood smooth, and paint or stain the birdhouse if desired.

Placement and Maintenance

Once your birdhouse is complete, choose a safe and inviting location:

  • Choose a protected spot: Place it out of direct sunlight and away from strong winds.
  • Mount it securely: Attach it to a tree, fence post, or other sturdy structure, ensuring it's high enough to avoid predators and easily accessible for birds.
  • Keep it clean: In the fall or winter, after the nesting season, remove any old nests and debris from the birdhouse. Clean it with a solution of water and vinegar, and let it dry completely before rehanging it.

With a little care and attention, your birdhouse will become a welcoming haven for birds, bringing joy and a touch of nature to your backyard. So grab your tools, unleash your creativity, and get ready to welcome your feathered friends!

Share:

How to design and build a grill gazebo with high ceilings

How to design and build a grill gazebo with high ceilings

Designing and Building a Grill Gazebo with High Ceilings: A Backyard Oasis

Who doesn't love the smell of grilling in the air, the company of friends and family, and the warmth of the summer sun? But what about when the sun is too high, the rain is pouring, or you just want a little more shade? Enter the grill gazebo â€" a perfect blend of functionality and style for your backyard. And with a little extra height, you can create a truly impressive, open space for your outdoor gatherings.

Planning Your Grill Gazebo

Building a gazebo is a big project, so it's crucial to start with a solid plan. This includes understanding your needs, space constraints, and budget.

1. Determine Your Needs

Think about what you want from your gazebo:

  • Size: How many people do you usually entertain? How big of a grill do you have?
  • Style: Do you prefer a traditional design or something more modern? What kind of roof do you envision?
  • Features: Do you want storage for your grilling equipment, a bar area, or even a built-in fireplace?
  • Budget: Set a realistic budget, considering the cost of materials, tools, and any potential labor.

2. Measure Your Space

Before you start designing, measure your backyard thoroughly. Consider these points:

  • Access: How will you move the materials and tools to your build site?
  • Utilities: Do you need electricity or gas for your grill and lights?
  • Drainage: Where will rainwater go?
  • Sunlight: Will you need shade during certain times of the day?

3. Choose Your Design

Now that you've considered your needs and space, it's time to get creative. Browse online for grill gazebo inspiration and get a feel for different designs. Here are some considerations:

  • Shape: Square, rectangular, octagon, or even round â€" the shape depends on your taste and available space.
  • Roof: A traditional gable roof is common, but consider hip, shed, or even a flat roof for a modern feel.
  • Posts: Wood, metal, or a combination? Choose materials that complement your home's style.
  • Open or Enclosed: Will you want walls for privacy or just an open roof for ventilation?

Designing for High Ceilings

Here's where the fun part comes in! High ceilings create a sense of grandeur and openness, which is perfect for a grill gazebo. Here are some ideas for maximizing the space:

1. Consider a Truss System

For high ceilings, a truss system offers a strong and visually appealing way to support the roof. These pre-engineered frames distribute weight evenly, allowing for larger spans and greater stability. They can also be customized to create interesting architectural details.

2. Add a Fan or Skylight

A ceiling fan can keep the air circulating, especially on hot days. A skylight adds natural light, making the space feel brighter and more inviting. Just remember to choose a skylight that can withstand the elements.

3. Explore Lighting Options

With high ceilings, you have more space to play with lighting. Consider string lights, pendant lamps, or even a chandelier for a touch of elegance.

4. Think Vertically

Tall walls provide space for storage, shelves, or even a small bar. You can also add vertical plants to enhance the natural feel.

Building Your Grill Gazebo

Now comes the exciting part - turning your design into reality! Here's a general outline of the steps, but always consult with local building codes and regulations:

1. Prepare the Site

Clear the area where you'll build your gazebo. Mark the perimeter of your structure and make sure the ground is level. You may need to add gravel or other materials to create a stable foundation.

2. Build the Foundation

For a gazebo with high ceilings, you'll need a strong foundation. Consider concrete piers, a reinforced concrete slab, or even a wooden deck. Each option has its own pros and cons, so choose the best fit for your needs and budget.

3. Erect the Posts

Install your chosen posts securely into the foundation. Make sure they are plumb and spaced correctly according to your design. You might need to use shims or adjust the posts as you go to ensure a level structure.

4. Assemble the Roof Frame

Depending on your chosen design, you might be working with pre-fabricated trusses or building the frame yourself. Use sturdy materials and connect the pieces securely with screws or bolts. Once the frame is complete, carefully raise it onto the posts and secure it in place.

5. Install the Roofing

This step depends on your choice of roofing material:

  • Shingles: Apply them in overlapping rows, starting at the bottom and working your way up.
  • Metal: Often pre-cut to fit your design, metal roofing is durable and low maintenance.
  • Fabric: Provides a lightweight and more modern look, but might require more frequent maintenance.

6. Add the Finishing Touches

Now's the time to personalize your gazebo! Add lighting, fans, storage, or any other desired features. Don't forget about the details â€" consider using decorative hardware, molding, or paint to complete the look.

Enjoying Your Grill Gazebo

Congratulations! You've built your very own grill gazebo with high ceilings. Now, it's time to relax, enjoy the space, and make memories. Just remember to follow these tips for long-lasting enjoyment:

  • Maintenance: Regularly inspect the structure for any damage or wear and tear. Clean and repair as needed.
  • Safety: Ensure that all electrical and gas connections are properly installed and working. Keep a fire extinguisher handy.
  • Decoration: Add comfortable furniture, plants, and decorations to make your gazebo a true oasis.

And most importantly, have fun! Your grill gazebo is a testament to your hard work and creativity. Enjoy grilling, relaxing, and making memories with friends and family in this beautiful space you've created.

Share:

Wooden clock-making 101: everything you need to know

Wooden clock-making 101: everything you need to know

Wooden Clock-Making 101: Everything You Need to Know

Imagine the satisfaction of crafting a beautiful and functional timepiece entirely from wood. Wooden clock-making is a rewarding hobby that combines woodworking skills with a touch of artistry. Whether you're a seasoned woodworker or just starting, this guide will equip you with the knowledge and tools to embark on your clock-making journey.

Getting Started: Essential Tools and Materials

Before diving into the construction, gather the necessary tools and materials.

Tools:

  • Hand saws: A crosscut saw for cutting across the grain and a rip saw for cutting with the grain are essential.
  • Chisels: A set of chisels in various sizes will be useful for shaping wood and creating precise cuts.
  • Sandpaper: Assorted grits, from coarse to fine, for smoothing surfaces and removing imperfections.
  • Drill: For drilling holes for clock movement components and other parts.
  • Screwdrivers: A set of screwdrivers in various sizes for assembling the clock.
  • Clamps: To hold pieces together securely while gluing.
  • Measuring tape: For precise measurements and layouts.
  • Pencil: For marking cuts and layouts.

Materials:

  • Wood: Choose a hardwood like oak, maple, or walnut for durability and aesthetic appeal. Softwoods like pine can also be used for less demanding projects.
  • Clock movement: The heart of the clock. Choose a movement that fits the size and style of your design.
  • Clock hands: Select hands that complement the style of the clock.
  • Wood glue: A strong wood glue is essential for securing joints.
  • Wood finish: Choose a finish that complements the wood and protects it from wear and tear.

Designing Your Clock

The design of your clock is as important as its construction. Consider these factors:

  • Style: Do you prefer a traditional, modern, or rustic aesthetic?
  • Size: How big do you want your clock to be?
  • Shape: Will it be square, round, or a custom shape?
  • Materials: What type of wood will you use? Will you incorporate other materials, like metal or glass?

Sketch out a few ideas and experiment with different layouts until you find a design that excites you. You can find inspiration from existing clocks, but remember to add your own personal touch.

Building the Clock Case

The clock case is the foundation of your timepiece. Here are the key steps:

  • Cut the pieces: Carefully cut the wood to the dimensions of your design.
  • Join the pieces: Use mortise-and-tenon joints, dovetail joints, or other methods to create strong and aesthetically pleasing joints.
  • Sand the case: Sand all surfaces to a smooth finish, progressing from coarse to fine grits.
  • Apply the finish: Apply a wood finish, such as stain, varnish, or polyurethane, to protect the wood and enhance its appearance.

Installing the Clock Movement

The clock movement is the mechanism that powers the hands. Here are the steps for installation:

  • Prepare the movement: Assemble the movement according to the manufacturer's instructions.
  • Mount the movement: Secure the movement to the back of the clock case using screws or brackets.
  • Attach the hands: Install the clock hands to the movement shaft in the correct order.

Finishing Touches

Once the movement is installed, add finishing touches to complete your creation:

  • Install a clock face: If your design includes a clock face, attach it to the front of the case.
  • Add decorative elements: Consider adding decorative elements like carvings, inlays, or paint to personalize your clock.
  • Hang the clock: Install a hanging mechanism on the back of the clock so you can proudly display your masterpiece.

Wooden clock-making is a rewarding journey that combines creativity, skill, and a touch of patience. Enjoy the process of crafting a unique timepiece, and let the ticking of your handmade clock be a testament to your craftsmanship!

Share:

How to build a handmade gun cabinet with custom racks for different firearms

How to build a handmade gun cabinet with custom racks for different firearms

Building a Handmade Gun Cabinet with Custom Racks

A well-organized gun cabinet is essential for any gun owner. It not only provides secure storage but also helps you easily access your firearms when needed. Building a handmade gun cabinet allows you to create a custom solution that perfectly fits your needs and aesthetic preferences. In this comprehensive guide, we will walk you through the steps of building a gun cabinet with custom racks to accommodate different firearms.

Planning and Design

Before you start building, careful planning is crucial. Consider the following:

Size and Dimensions

Determine the size of the cabinet you need based on the number and types of firearms you plan to store. Measure the space where you will place the cabinet to ensure it fits comfortably.

Materials

Choose high-quality materials that are durable and suitable for the purpose. Common options include:

  • Wood: Plywood, MDF, solid hardwood
  • Metal: Steel, aluminum

Wood is a popular choice for its aesthetic appeal and workability, while metal offers exceptional strength and security.

Style and Features

Consider the style of your home décor and the desired features, such as:

  • Doors: Hinged, sliding, or bi-fold
  • Locking mechanism: Key lock, combination lock, or electronic lock
  • Interior features: Adjustable shelves, custom racks, lighting

Drawings and Plans

Create detailed drawings or blueprints of your cabinet design, including dimensions, materials, and assembly instructions. This will help you visualize the project and ensure accuracy during construction.

Tools and Supplies

Gather the necessary tools and supplies for building the cabinet:

  • Power tools: Circular saw, jigsaw, drill, sander
  • Hand tools: Hammer, screwdriver, measuring tape, level
  • Fasteners: Screws, nails, glue
  • Finishing materials: Wood stain, paint, varnish
  • Hardware: Hinges, handles, locks
  • Safety gear: Eye protection, gloves, hearing protection

Construction Process

Follow these steps to construct your gun cabinet:

Building the Cabinet Body

1. Cut the cabinet sides, top, bottom, and back panels to the desired dimensions using a circular saw or jigsaw. 2. Use wood glue and screws or nails to assemble the cabinet body. Ensure the corners are square and the panels are flush. 3. Add reinforcement to the cabinet sides and back for strength and stability. 4. Install a shelf or shelves to divide the cabinet into sections.

Creating Custom Racks

1. Measure the size and shape of your firearms. 2. Cut the rack components (e.g., rods, hooks, trays) from the desired material using appropriate tools. 3. Design and build the racks to accommodate different firearm sizes and types, ensuring proper spacing and security. 4. Install the racks securely to the cabinet walls or shelves.

Adding Doors and Hardware

1. Attach the door hinges to the cabinet sides and doors. 2. Install the lock mechanism on the door and the corresponding strike plate on the cabinet body. 3. Add handles or knobs to the doors for easy opening and closing. 4. Ensure the doors close securely and the lock functions properly.

Finishing Touches

1. Sand the cabinet and racks to smooth out any imperfections. 2. Apply a finish to the cabinet, such as stain, paint, or varnish, to protect the wood and enhance its appearance. 3. Allow the finish to dry completely before placing your firearms inside.

Safety and Security Considerations

Prioritize safety and security when building and using your gun cabinet. Follow these guidelines:

  • Use high-quality materials and construction techniques.
  • Install a reliable locking mechanism that is difficult to break into.
  • Secure the cabinet to the wall or floor for additional stability and to prevent theft.
  • Store firearms unloaded and separately from ammunition.
  • Keep the cabinet key or combination safe and out of reach of children.

Conclusion

Building a handmade gun cabinet with custom racks offers a unique and practical solution for storing your firearms. By following these steps, you can create a secure and stylish storage space that meets your specific needs. Remember to prioritize safety and security throughout the process, ensuring that your firearms are stored responsibly and responsibly.

Share:

Step-by-step guide to building a wooden gun cabinet with multiple sections

Step-by-step guide to building a wooden gun cabinet with multiple sections


For firearm owners seeking secure storage and aesthetically pleasing organization, a custom-built wooden gun cabinet offers unparalleled functionality and craftsmanship. This comprehensive guide will equip you with the knowledge and steps necessary to construct a multi-section gun cabinet, ensuring a safe and visually appealing solution for your firearm collection.

I. Planning and Design

1. Define Your Requirements:
Size and Dimensions: Determine the desired height, width, and depth of the cabinet to accommodate your firearms and desired storage capacity. Consider the dimensions of your longest firearm and add additional space for padding and safe handling.
Number of Sections: Decide on the number of individual sections within the cabinet. Separate sections allow for organized storage of various firearms, accessories, and ammunition.
Desired Features: Include features like adjustable shelves, lockable compartments, built-in humidifiers, and specialized compartments for scopes, optics, or cleaning supplies.

2. Material Selection:
Wood Species: Choose a sturdy, durable wood like oak, maple, cherry, or walnut. Consider the aesthetic appeal and workability of each species.
Plywood or Solid Wood: Plywood offers cost-effectiveness and dimensional stability, while solid wood provides a more premium and aesthetically pleasing finish.
Hardware and Fasteners: Select high-quality hinges, drawer slides, locks, and fasteners that are rated for the weight of the cabinet and its contents.

3. Sketch and Design:
Drawings: Create detailed sketches or utilize CAD software to visualize the cabinet's layout, including the dimensions of each section, shelves, doors, and drawers.
Material List: Develop a comprehensive list of all materials required, including wood, hardware, fasteners, and finishing products.
Budgeting: Estimate the cost of materials and anticipate potential additional expenses to ensure a realistic budget.

II. Construction Process

1. Cutting and Assembling:
Cut Wood: Utilize a table saw, circular saw, or chop saw to accurately cut the wood pieces according to your design plans.
Joints: Choose appropriate joints for assembly, such as mortise and tenon, dovetail, or butt joints with glue and screws.
Framing: Construct the cabinet's frame using strong, durable wood.
Shelves and Drawers: Cut and assemble shelves and drawers according to your design. Ensure shelves are adjustable for future customization.

2. Door and Drawer Construction:
Door Frames: Cut and assemble the door frames, incorporating sturdy hinges and locking mechanisms.
Drawer Faces: Cut and assemble drawer faces using rabbet joints for stability.
Door Panels: Choose solid wood or plywood for door panels, taking into account the overall weight and aesthetics.
Drawer Slides: Install smooth-operating, heavy-duty drawer slides for ease of use.

3. Finishing Touches:
Sanding: Thoroughly sand the entire cabinet, starting with coarse grits and progressively refining with finer grits for a smooth surface.
Finishing: Choose a suitable finish for the wood, such as oil-based polyurethane, water-based polyurethane, or lacquer. Apply multiple coats for durability and a beautiful sheen.
Hardware Installation: Install hinges, locks, drawer pulls, and other hardware according to manufacturer instructions.

4. Assembly and Installation:
Cabinet Assembly: Assemble the cabinet according to your design plans, ensuring all joints are securely fastened.
Door and Drawer Installation: Attach doors and drawers to the cabinet, ensuring proper alignment and function.
Final Adjustments: Make any necessary final adjustments, such as tightening screws and fine-tuning drawer slides.

III. Safety and Security Considerations

1. Lock Selection:
Security Rating: Choose locks with a high security rating, capable of resisting forced entry and picking.
Keyed Locks: Use keyed locks for enhanced security, allowing for multiple keys if needed.
Combination Locks: Consider combination locks for added convenience and security.

2. Cabinet Placement:
Secure Location: Install the cabinet in a secure location, away from potential threats.
Wall Anchoring: Securely anchor the cabinet to the wall using strong anchors and mounting brackets.

3. Storage Practices:
Proper Storage: Store firearms unloaded and in a manner that prevents accidental discharge.
Ammunition Storage: Keep ammunition separately and locked, ideally in a separate safe or compartment.

IV. Additional Tips and Considerations:

1. Customization:
Interior Lighting: Install interior lighting to enhance visibility and accessibility.
Humidity Control: Consider a built-in humidity control system to prevent rust and damage to firearms.
Fireproofing: Apply a fire-retardant coating for added protection against fire.

2. Tools and Equipment:
Table Saw: For accurate cutting of wood.
Circular Saw: For cutting larger pieces of wood.
Chop Saw: For precise miter cuts.
Drill Press: For accurate drilling and hole placement.
Router: For creating decorative edges and grooves.
Sanding Equipment: For smoothing surfaces.
Finishing Equipment: For applying stains and coatings.

3. Safety Precautions:
Eye Protection: Always wear safety glasses when using power tools.
Hearing Protection: Wear hearing protection when operating loud machinery.
Dust Mask: Use a dust mask to protect your respiratory system.
Fire Extinguisher: Keep a fire extinguisher nearby.

Conclusion:

Building a multi-section wooden gun cabinet is a rewarding endeavor that combines craftsmanship with a practical solution for securing your firearm collection. By following this comprehensive guide, you can construct a durable, visually appealing, and secure cabinet that will provide years of safe and organized storage. Remember, meticulous planning, high-quality materials, and careful construction are essential for achieving a high-quality and functional result. Always prioritize safety and security when designing and assembling your gun cabinet, ensuring the well-being of yourself and others.

Share:

Popular Posts

Cari Blog Ini

Powered by Blogger.

Recent Posts

Pages